REVIEW · SAN FRANCISCO
An Exciting Scavenger Hunt: Along Fisherman’s Wharf
Book on Viator →Operated by Let's Roam · Bookable on Viator
Sea legs meet brain teasers on the Wharf. This self-guided Fisherman’s Wharf adventure turns one of San Francisco’s best-known stretches into a game you can pace yourself, using the Let’s Roam app for clues and maps. Two things I really like: you can start whenever you want (no fixed departure), and you’ll never feel helpless thanks to in-app navigation that helps you keep moving.
I also like how it turns sightseeing into friendly competition. Each player gets a role and photo challenges, so even if your group has different energy levels, you still all have something to do. One catch: getting started in the app can feel confusing at first, so give yourself a few minutes at the meeting point to get your phone ready before you press play.
In This Review
- Key Things to Know Before You Go
- How the Fisherman’s Wharf Scavenger Hunt Works in 2 Hours
- Price and Value: Is $12.31 Worth It?
- Getting Started Near 2350 Taylor St: Don’t Skip the Prep
- Stop-by-Stop: Pier 43 to the Embarcadero (Your First Clues)
- From Coit Tower to Ghirardelli Square: Views and Photo Moments
- Maritime Museum to Hyde Street Pier: Make the Water Part of the Game
- Lombard Street Loop: A City-Spotting Challenge
- Fisherman’s Wharf Proper: When the Route Becomes the Destination
- Angel Island State Park and Pier 39: Closing the Circle
- App Roles and Photo Challenges: How to Keep a Group Interested
- Weather, Shoes, and Real-World Walking Tips
- Who Should Book This Fisherman’s Wharf Hunt?
- Should You Book It?
- FAQ
- How long is the Fisherman’s Wharf scavenger hunt?
- Can I start the hunt at any time?
- Is there a live guide with this experience?
- What’s included in the hunt?
- Do I need to bring a charged smartphone?
- Is it refundable if I cancel?
Key Things to Know Before You Go
- Start anytime within the opening window, so you can fit it around your day
- App maps + scavenger instructions help you avoid the classic parking-lot-turned-lost feeling
- Photo challenges with role choices (Braniac, Photographer, Mapper) make it more than trivia
- Individually assigned roles keep groups engaged instead of everyone watching one phone
- Multiple Wharf landmarks in one route means walking a tight loop through recognizable stops
- 2-hour pace keeps the game moving without turning into a whole day commitment
How the Fisherman’s Wharf Scavenger Hunt Works in 2 Hours
This is a self-guided scavenger hunt, which means you’re not waiting for anyone. You use a mobile ticket and the Let’s Roam app to play. The hunt is built around riddles, photo challenges, and leaderboards, but the real value is simpler: it gives your walk through Fisherman’s Wharf structure.
In practice, that structure is what makes the area click. Fisherman’s Wharf can be a lot—tour buses, snack counters, street performers, and crowds all trying to pull your attention. A game lens cuts through that noise. You’re not just walking past landmarks. You’re hunting for answers and switching between tasks, which keeps you focused and makes the route feel like a story.
It also helps that the hunt is designed to work with a group. You’ll be answering clues and completing tasks alongside others, whether you choose to cooperate or compete. It’s still self-guided, but the tone is very much: play with your people.
You can also read our reviews of more tours and experiences in San Francisco.


Price and Value: Is $12.31 Worth It?

At $12.31 per person for about 2 hours, the price is on the low side for a structured activity in central San Francisco. You’re not paying for a guide’s time—your phone and the app do that work. So the value comes from three things:
First, you get a planned walking route with lots of stops in the Fisherman’s Wharf orbit—Pier 43, Ghirardelli Square, maritime sites, and more. Second, you get multiple rounds of participation via photo challenges. Third, you get maps in the app, which reduces wasted time.
If you’re the type who likes exploring but gets bored with “walk around and hope for inspiration,” this kind of format can be worth it. If you hate phone-based navigation or you prefer a full guided tour with deep narration, you might find it better to look at something else.
Getting Started Near 2350 Taylor St: Don’t Skip the Prep
The meeting point is 2350 Taylor St, San Francisco, CA 94133. The hunt ends back at the meeting point, so you’re essentially doing a loop.
Plan to arrive with a calm minute or two. You need a fully charged smartphone because the app handles the maps, riddles, and photo challenges. If your battery is low, bring a power bank—this is the easiest upgrade you’ll make all day.
Also, start thoughtfully. The experience lets you begin at any time during the opening window, which is 7:00 AM to 10:00 PM every day. That flexibility is fantastic, but it also means you should pick a time when you won’t be rushing through setup. One small misstep at the start can slow you down, and you want your first clue to land fast.
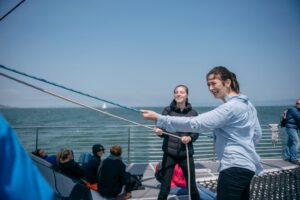
Once you’re rolling, you’ll see prompts on your phone and you’ll follow directions between stops. If you’re playing as a group, decide who’s taking which role. The roles you can choose for photo challenges are Braniac, Photographer, or Mapper. It’s a small detail, but assigning it early prevents the classic group moment where everyone suddenly wants to change jobs halfway through.
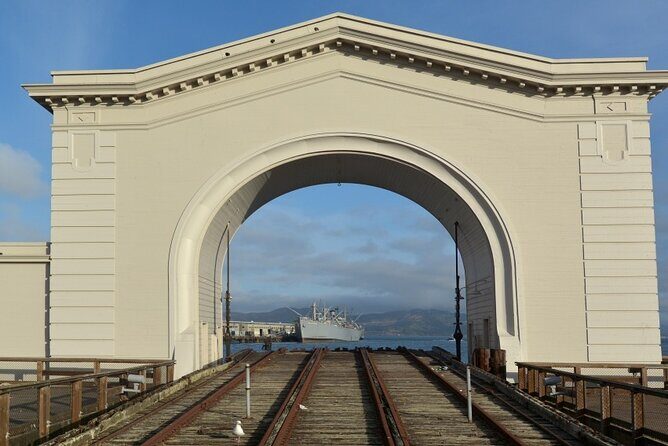
Stop-by-Stop: Pier 43 to the Embarcadero (Your First Clues)
You kick off at Pier 43 Ferry Arch. This is a smart first move because it immediately places you in the waterfront rhythm of the neighborhood. Expect your early clues to guide you into the idea of the hunt: look up, look around, and match what you see with what the app asks for.
Next you move to the Embarcadero. This stretch is one of the easiest ways to get your bearings quickly. You’re not wandering into random side streets. You’re staying on a main spine where landmarks and signage do some of the work for you.
You’ll also pass through the San Francisco Art Institute area. Even if you’re not there for art classrooms, it’s a nice palate cleanser from pure tour-state-of-mind sightseeing. The hunt format nudges you to pay attention to details you might normally glide past.
From Coit Tower to Ghirardelli Square: Views and Photo Moments
Then you’ll reach Coit Tower. The game logic here is simple: you’re moving from waterfront flatness into a spot people associate with skyline views. Use this as your moment to catch your breath, scan the surroundings, and check where your next photo prompt is leading you.
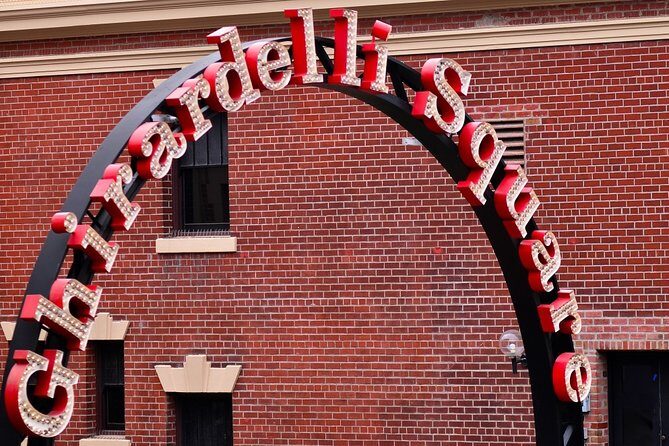
After that comes Ghirardelli Square. This stop is famous for a reason, and in this hunt it serves as both a landmark and a morale booster. When you’re doing a scavenger route, having a recognizable, easy-to-navigate anchor point helps. It makes your progress feel real.
You’ll return to Ghirardelli Square again later in the route. That repetition can actually be useful: it gives you a second chance to nail photo tasks or confirm you’re on track when the day is busy and your brain is full of clues.


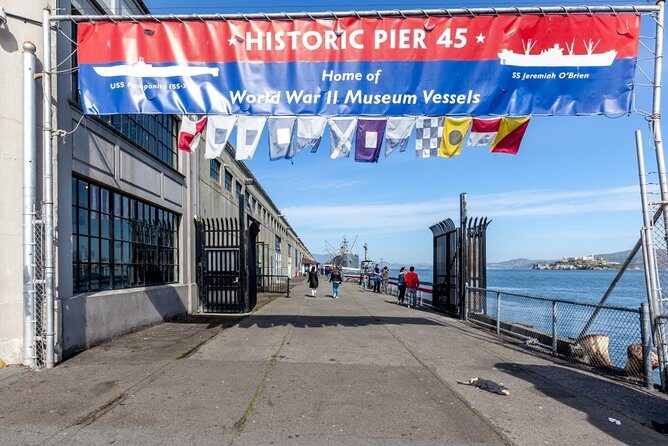
Maritime Museum to Hyde Street Pier: Make the Water Part of the Game
The hunt includes the San Francisco Maritime Museum / Aquatic Park Bathhouse Building area. This is a great pocket because it shifts your attention from street-level tourist energy to something more grounded in the waterfront’s working past.
Then you move to Hyde Street Pier. This part of the experience is what I’d call “let your surroundings do the teaching.” The app asks you to solve tasks, but the setting does the emotional work: you’re in a maritime zone that naturally supports the theme of the hunt.
You’ll also visit a San Francisco Maritime National Historical Park Visitor Center. Having a visitor center on the route is handy. Even when the app is doing the clue work, it’s a good place to reset—check your phone, regroup your team, and make sure you’re not falling behind.
Lombard Street Loop: A City-Spotting Challenge
The route includes Lombard Street, and you’ll see it more than once. That’s a big clue about the hunt’s design. Instead of treating Fisherman’s Wharf as one straight line, the hunt connects waterfront landmarks to iconic street scenes nearby.
This is where I’d pay attention to your “Mapper” role (if you chose that). The app’s maps and your job overlap nicely in areas where the street grid can confuse your internal GPS. If you didn’t assign a mapper, you can still use the phone map to keep the route feeling controlled.
Because it’s a self-guided walk, Lombard Street also helps break up the concentration required for photo challenges and riddles. Even if you’re thinking hard, the route change gives your brain a small reset.
Fisherman’s Wharf Proper: When the Route Becomes the Destination
Eventually you reach Fisherman’s Wharf and then you keep going with a set of fun stops that match the neighborhood’s identity.
You’ll see Musee Mecanique next. This works well in a scavenger hunt because it’s a place where you can easily imagine photo prompts and visual riddles. If the app asks you to find something specific, you’ll have multiple chances to spot details without losing the group.
Then the hunt heads to Madame Tussauds. This stop is more about iconic recognition. If your group likes a mix of silly and famous, it’s a good energy shift. And since the hunt is role-based, the person who’s in the photographer lane can lean in while others keep the clue momentum moving.
Angel Island State Park and Pier 39: Closing the Circle
One of the more surprising elements is that the route includes Angel Island State Park. You may not get the same experience as a full island day trip, but as part of this hunt it adds a “bigger than the Wharf” sense of place. It’s a reminder that San Francisco’s waterfront isn’t just attractions—it’s geography.
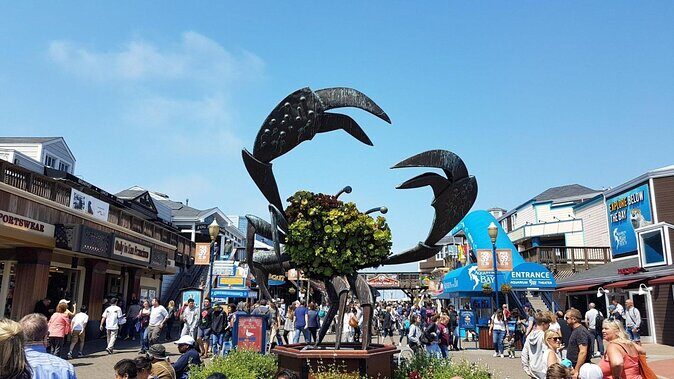
Finally, you reach Pier 39. This is a strong closer because it’s easy to recognize, easy to find within the neighborhood, and it gives the whole hunt a finish-line feeling. Since the activity ends back at the meeting point, you’ll continue from the final tasks to wrap up and return, keeping the route loop intact.
App Roles and Photo Challenges: How to Keep a Group Interested
The core participation mechanic is photo challenges tied to roles: Braniac, Photographer, or Mapper. Even if you’ve got one person who loves photos and another who hates taking them, the role system gives you a built-in workaround.
Here’s how to make this work smoothly:
- Assign roles quickly when you start
- Keep your group close enough that everyone can see what’s being photographed or mapped
- Use the app prompts as your shared mission, not a secret task on someone’s screen
The other big benefit of roles is pacing. A hunt with only riddles can feel like a phone debate. With photo tasks, there’s a natural momentum shift. You’re still problem-solving, but you’re also moving, looking, and doing.
And because you’ll get digital copies of your adventure hunt photos, the effort feels like it leaves a trace. It’s not just memory; it’s a little souvenir set for your group.
Weather, Shoes, and Real-World Walking Tips
The only physical requirement mentioned is moderate physical fitness level. That usually means you’re on your feet and moving between stops for about two hours. Bring comfortable shoes. You’re following an active route through the waterfront and street areas, so plan for lots of pavement.
Weather matters too. Check the forecast and dress appropriately. If fog or wind rolls in, you’ll be glad you layered.
And as mentioned earlier: keep your phone charged. The hunt is app-driven, so your device is your tool, your map, and your clue board.
Who Should Book This Fisherman’s Wharf Hunt?
This scavenger hunt is a strong fit if you want:
- A self-guided activity (you control pace and timing)
- A light competitive edge for couples, friends, or families
- A way to see landmarks without paying for a full guided tour
- A structured walking loop that helps you avoid aimless wandering
It’s also a good choice for families because there’s no minimum age listed. That said, it’s still a walking activity. For younger kids, you’ll probably want to keep expectations flexible and let the role system help them stay engaged.
If you hate solving puzzles on your phone or you want deep historical narration, you may feel underfed. This is more about exploration through tasks than a guided lecture.
Should You Book It?
Yes, you should book this Fisherman’s Wharf scavenger hunt if you want a fun, low-cost way to turn a crowded tourist area into something you can manage and enjoy. The biggest advantages are the start-anytime flexibility and the app tools that help you stay on track.
You should think twice if you know you get frustrated with app setup or you only have a weak phone signal situation where you’ll be. Give yourself time at the start to download, load, and confirm everything is working. If you do that, the hunt’s format makes it easy to have a good time without feeling like you’re fighting your day.
FAQ
How long is the Fisherman’s Wharf scavenger hunt?
It takes about 2 hours (approx.) to complete.
Can I start the hunt at any time?
Yes. There’s no set time to start, and it runs during the opening hours (7:00 AM to 10:00 PM).
Is there a live guide with this experience?
No. This is self-guided, and you use the Let’s Roam app to play.
What’s included in the hunt?
You get the self-guided San Francisco adventure hunt, individual roles for each player, photo challenges with role options, app access for maps and challenges, digital copies of your photos, and support by phone, email, or chat.
Do I need to bring a charged smartphone?
Yes. You should make sure your smartphone is fully charged because you’ll use it for navigation and interaction with the app. A power bank is recommended if needed.
Is it refundable if I cancel?
No. The experience is non-refundable and cannot be changed for any reason.