REVIEW · SAN FRANCISCO
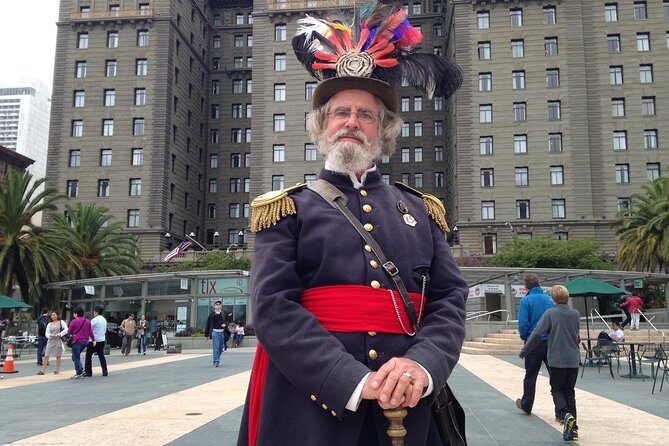
Emperor Norton’s Fantastic San Francisco Time Machine
Book on Viator →Operated by Emperor Norton's Fantastic San Francisco Time Machine · Bookable on Viator
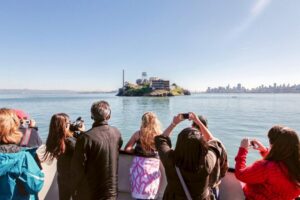
San Francisco’s history comes with a character guide. I love how the tour uses Emperor Norton’s stories to connect everyday streets to real moments, and I love that it spotlights the Barbary Coast and the 1906 earthquake without turning into a lecture. One thing to plan for: it’s still a city walk, so bring comfortable shoes and expect about two miles at a leisurely pace.
You’ll start at Union Square and move through classic areas at a relaxed rhythm, with the added bonus of a small group (max 10). Expect a costumed guide, easy conversation along the way, and the practical reality of required masks/social distancing.
The walk ends near Old Saint Mary’s Cathedral, right where the last stop ties the whole story together. If you want a fun, low-cost way to get your bearings and understand how San Francisco grew, this is a strong afternoon pick.
In This Review
- Quick reasons this Norton time machine is worth your $20
- Time Travel on Foot: What This Two-Mile Norton Walk Really Delivers
- Start at Union Square: Getting Your Bearings in the Middle of It All
- Stop 1: Barbary Coast Trail and the Real Streets of Notoriety
- Stop 2: Union Square and the Dewey Monument
- Stop 3: Jackson Square and the Barbary Coast Backstory
- Stop 4: Maiden Lane, Glamour, and the Brothel Era
- Stop 5: Lotta’s Fountain, 1875, and the 1906 Earthquake Commemoration
- Stop 6: Portsmouth Square and the Birthplace-Plus Chinatown Connection
- Stop 7: Old Saint Mary’s Cathedral and the Emperor’s Final Thread
- The Value Question: Is a $20 Time Machine Worth Your Afternoon?
- Who This Tour Fits Best (and Who Might Want Something Else)
- Quick Tips to Make the Most of It
- Should You Book Emperor Norton’s Fantastic San Francisco Time Machine?
- FAQ
- How long is the Emperor Norton walking tour?
- How far will I walk?
- Where does the tour start and where does it end?
- What is the price?
- Is this tour a mobile-ticket experience?
- What are some of the main stops on the route?
- Do I need to wear a mask or follow distancing rules?
- Can I get a full refund if plans change?
Quick reasons this Norton time machine is worth your $20
- Costumed guide energy: Emperor Norton turns history into something you can follow step by step
- Two big story arcs: the Barbary Coast era plus the 1906 earthquake and its aftermath
- Easy walking format: about two miles total, leisurely pace, small group size
- Landmark-by-landmark context: Union Square, Maiden Lane, Portsmouth Square, and more
- Great photo stops: Lotta’s Fountain, Jackson Square, and Old Saint Mary’s Cathedral area
Time Travel on Foot: What This Two-Mile Norton Walk Really Delivers
This is a walking tour built for people who want the city to make sense fast. Instead of doing one “big” site, you move through several neighborhoods in a smooth arc, which helps your brain connect place names to events.
At around two hours, you get enough time for stories, pauses, and people-watching without feeling rushed. The route is designed for a leisurely pace, so you’re walking mostly for discovery rather than exercise.
And yes, you’ll hear the Barbary Coast and 1906 earthquake stories more than once, but each time they land in a different spot. That repetition is useful: it turns vague “San Francisco was wild” ideas into a timeline you can actually picture.
The small-group size (up to 10) matters too. When you’re not packed in with dozens of people, it’s easier to ask questions and stay engaged with the guide’s pacing.
You can also read our reviews of more tours and experiences in San Francisco.


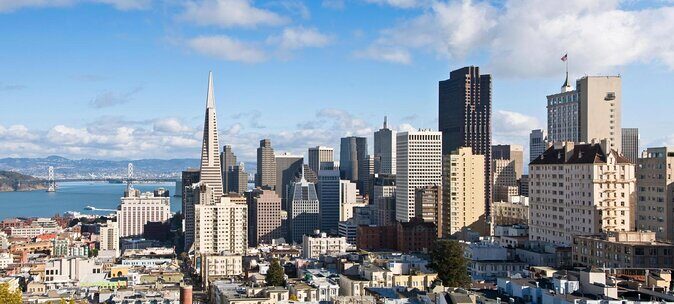
Start at Union Square: Getting Your Bearings in the Middle of It All
You’ll meet at Union Square, right in the heart of downtown. Starting here is smart, because Union Square gives you a modern reference point before you move into the older, rougher, more surprising past.
From there, the tour flows toward the Barbary Coast Trail area first. Even if you already know Union Square’s general look, you’ll likely see it differently once the guide frames it as part of the city’s shifting story.
A practical note: this is a ticketed walking experience (mobile ticket), and masks/social distancing are required. If you’re traveling with a service animal, the tour allows service animals, which helps make the format more flexible.
Stop 1: Barbary Coast Trail and the Real Streets of Notoriety
The Barbary Coast Trail is the tour’s opening thread, winding through multiple historical sites. The key value here isn’t just that the Barbary Coast is famous—it’s that you’re shown how the area’s reputation connects to actual streets and corners.
You’ll learn the context for why this part of San Francisco became associated with vice and chaos, and you’ll get a sense of what people were like when the city was growing fast. That matters because it stops the story from feeling like generic “old-timey gossip.”
One potential drawback with this kind of storytelling is that it can be heavier if you prefer family-friendly history only. The tour frames the Barbary Coast as notorious, so it’s not sanitized—but if you want honest local color, this is where the tone starts.
Stop 2: Union Square and the Dewey Monument
Next you circle back into Union Square proper, with a focus on its history and the Dewey Monument. This is a nice contrast to the Barbary Coast portion: the tour shows you how San Francisco also built civic pride, not just a reputation for trouble.
You’ll spend a short, focused time here, so you’re not stuck reading plaques for too long. The payoff is learning how monuments and public spaces reflect what a city wants to project.
Even if you’ve passed the monument before, the stories can change how you see it. That’s the whole goal of this walk: to help you notice the meaning behind familiar shapes.
Stop 3: Jackson Square and the Barbary Coast Backstory
Jackson Square is where the tour keeps tightening the timeline. The focus here is the history of the notorious Barbary Coast, with Jackson Square acting like a visual anchor for the era.
This stop works well because it’s specific. Instead of saying “the Barbary Coast existed somewhere nearby,” you get the feeling of walking through the edges of it—places where you can imagine daily life happening next to the headline-grabbing reputation.
If you like history that connects street layout to social history, you’ll probably enjoy this stop most. If you want only big museum-style facts, it may feel more narrative than archival—but that’s also why it’s entertaining.


Stop 4: Maiden Lane, Glamour, and the Brothel Era
Then you move to Maiden Lane, a street with a very different vibe than the Barbary Coast Trail areas you started with. Here, the tour highlights how Maiden Lane used to be lined with brothels.
This isn’t presented just as scandal. It’s used to explain how San Francisco’s growth brought together commerce, entertainment, and migration—sometimes in ways residents didn’t control the way they would later.
The time here is brief, which is good. You get the key story without turning it into an overly long stop that breaks the flow of the afternoon.
Stop 5: Lotta’s Fountain, 1875, and the 1906 Earthquake Commemoration
Lotta’s Fountain is one of the most memorable stops, partly because the fountain itself is a recognizable gathering point and partly because the tour layers multiple stories onto the same spot.
You’ll learn that Lotta’s Fountain has been a gathering place since 1875, and you’ll hear about the yearly earthquake commemoration connected to the area. The tour also touches on stories of buildings that survived the 1906 quake—one of those details that makes the earthquake feel less abstract.
This is also where the guide name-drops historical performers and personalities you might recognize. The stop includes stories involving Lotta Crabtree, Lola Montez, and Luisa Tetrazzini. If you like connecting famous names to real neighborhoods, this is a great place to pay attention.
One consideration: this stop involves more storytelling than some of the others, so if you’re easily distracted by foot traffic, bring your patience. The reward is that you leave with a clearer picture of what “surviving 1906” meant in everyday terms.
Stop 6: Portsmouth Square and the Birthplace-Plus Chinatown Connection
Portsmouth Square adds a different kind of meaning to the tour. It’s described as the birthplace of San Francisco and also as Chinatown’s living room, so it holds both origin-story importance and community significance.
This stop is valuable because it broadens the tour beyond the nightlife-and-disaster framing. You’re not only learning about wild eras; you’re seeing how public squares become social anchors for generations.
If you’ve ever wondered why certain neighborhoods feel like they have their own heartbeat, this is the kind of stop that helps you understand the “why.” Even in a short time window, you’ll get a better mental map of where civic life and cultural life overlap.
Stop 7: Old Saint Mary’s Cathedral and the Emperor’s Final Thread
The final stop ties the whole experience together at Old Saint Mary’s Cathedral. You’ll hear the history of the cathedral and also stories about the passing of Emperor Norton.
Ending here is a smart move because it gives the walk a sense of closure. You finish at a place with a strong presence, and the guide’s Norton-story framing helps your brain connect the tour’s time-travel theme to a real location.
This last segment lasts only a short time, so it doesn’t drag. It also works well if you want to continue exploring afterward, since the tour ends right in the same area you could use as a jumping-off point for more sightseeing.
The Value Question: Is a $20 Time Machine Worth Your Afternoon?
$20 for a two-hour, costumed guided walk that covers multiple landmark neighborhoods is a pretty fair deal. You’re paying for interpretation—someone turns streets into a story, and that usually costs more than a simple self-guided walk.
What makes the value better is how efficiently the tour uses time. You’re not spending long stretches commuting between far-apart areas, and the route is built so that each stop adds a new layer. By the time you reach Lotta’s Fountain and the 1906 earthquake commemoration, the earlier Barbary Coast stops stop feeling like separate trivia.
The small group size helps too. You’re not being squeezed into a crowd, and you get more of the guide’s attention, which is part of what you’re really buying.
If you’re on a budget but want something more engaging than reading plaques, this is one of those tours that fits the “low cost, high payoff” category.
Who This Tour Fits Best (and Who Might Want Something Else)
You’ll probably love this experience if you enjoy:
- walking tours that mix stories with landmark context
- seeing how a city’s past shapes its present layout
- history that’s entertaining, specific, and tied to streets you can still visit
You might want to think twice if:
- you prefer museum-style tours with minimal walking
- you want strictly neutral, polished history without the notoriety of the Barbary Coast theme
- you’re sensitive to crowds or foot traffic, since it’s a downtown walking route
For most people with moderate fitness, the leisurely pace and short, repeated stop structure make it manageable.
Quick Tips to Make the Most of It
Come ready to walk and look up as well as forward. A lot of the fun here comes from connecting what you’re hearing to what you see around you.
Wear shoes you can stand in for a while. Even though the pace is described as leisurely, you’re still out for about two miles total.
And if you’re the type who likes a good food stop afterward, it helps to listen during the tour for local recommendations. One of the best parts of the experience is that the guide style often comes with practical suggestions, like pointing people toward lunch options such as Neiman Marcus popovers.
Should You Book Emperor Norton’s Fantastic San Francisco Time Machine?
If you want an inexpensive afternoon that teaches San Francisco in a way that sticks, I’d book it. The combination of a costumed guide, a tight route of meaningful landmarks, and two major story lines (Barbary Coast and 1906) makes this one of the more satisfying “first or second day in town” history options.
It’s also a great choice if you like character-led storytelling and you want to see multiple neighborhoods without spending hours planning. With free cancellation available up to 24 hours in advance, you can book with confidence and adjust if your schedule changes.
FAQ
How long is the Emperor Norton walking tour?
The tour is approximately 2 hours.
How far will I walk?
You can expect about 2 miles of leisurely walking.
Where does the tour start and where does it end?
It starts at Union Square, San Francisco and ends at Old Saint Mary’s Cathedral at 660 California St, San Francisco.
What is the price?
The tour price is $20.
Is this tour a mobile-ticket experience?
Yes, it includes a mobile ticket.
What are some of the main stops on the route?
Key stops include Union Square, Jackson Square, Maiden Lane, Lotta’s Fountain, Portsmouth Square, and Old Saint Mary’s Cathedral, plus the Barbary Coast Trail.
Do I need to wear a mask or follow distancing rules?
Yes. Masks and social distancing are required.
Can I get a full refund if plans change?
Yes. You can cancel up to 24 hours in advance for a full refund.